An Exercise in Frontal Area Adjustment
for Improved Aerodynamics (sounds techy, huh?)
The Goal
I'll say right up front, that the information below, and any conclusions derived from the session described are purely anecdotal. This is not intended to be a scientific study of any kind.
When Peter and I got together, our goal was to take a look at his position on his time trial bike and see how he might start adjusting that position moving forward into the 2004 season. It helped that he had just gotten a new time trial rig too, and had ridden it a few time on the trainer. My hope was that using a digital camera, we could look at Peter's position from a standpoint of frontal area exposure and pinpoint one or more ways he could reduce the amount of area exposed to the wind and thus, hopefully, improve his times in the coming season. It would have been much easier for me to just look at Peter on the bike and give him feedback telling him to do this and that, but I thought it important that he see what he gets for a certain amount of contortion, or focus. So I wanted to be sure that I could document the differences in some way.
The Set-Up
Rider: Peter Richardson
The Bike: Felt Time Trial with Syntace cow horn and aerobars.
Other Equipment: Aero helmet; digital camera and tripod.
The Process
Capture digital photos of Peter in various positions on the bike. Make adjustments to bars, physical position and saddle position, document changes along the way. Post process photos to illustrate effective differences in frontal area exposure.
So here it goes...
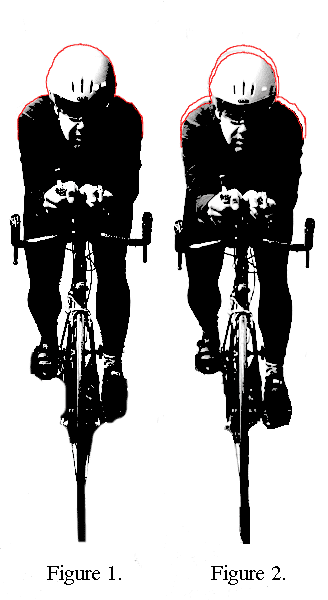
| Before we did anything I took a picture of Peter, head-on, as he naturally sat on the bike, with no input from me (Figure 1.).
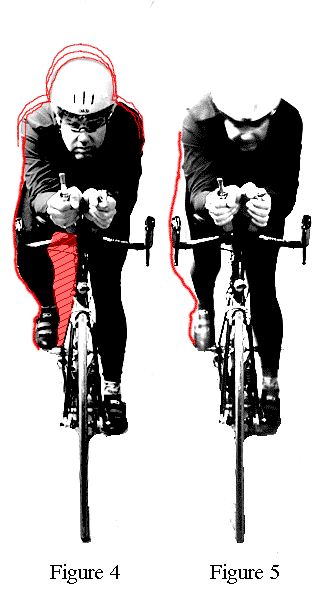
Peter was already getting his head pretty low, and we discussed, for a short time, trying to get his head a bit lower and focusing on looking straight ahead, trying to minimize the number of time he would look down. Doing so raises the rear of the helmet up, and exposes more mass to the wind. Next we talked about flexibility in his hamstrings and low back, seeing if it was possible to remove one of the spacers from his headset, and him still be comfortable. We removed the space and the result was Figure 2. The top red line is the outline of his shoulders and helmet as they were in Figure 1. Compared to the outline around his new position (the lower red line in Figure 2) you can see the difference. Not a huge change but a reduction of frontal area none the less. We determined that further lowering of the front end of the bike is possible and plan to do so as the season progresses and Peter's flexibility improves. As a note, we did talk about getting Peter's elbows closer together. Moving the elbows closer together is a balancing act between aerodynamics and having safe control of the bike. Peter too is plagued by an injury that generates some discomfort in his left shoulder. So we'll need to be sensitive to that as we move forward. Next, we started looking at Peter's position fore and aft on the saddle depending on the terrain. For instance, if he were climbing a slight grade, he would want to shift himself back on the saddle bit to get more extension out of his legs and generate more power from his hips, low back, glutes and hamstrings. The result was a further reduction of frontal area as seen in Figure 3. It is possible that a shift of the saddle back on the rails may be helpful, but we opted to wait until we get ont he road to make any major saddle position changes. The other area we focused on was Peter's knee placement. At the start of the session Peter had a tendency to flick his right knee out at the top of the pedal stroke. He did so with his left knee also, but not as great an extent. We talked for a few minutes, had him slow down his cadence, and practice for another few minutes. We talked about focusing on bringing his knees up, and then crossing them to the inside, over the toptube. This was an exaggerated exercise, but it worked to give him a feel for keeping his knees tighter to the frame. Figures 4 is a photo taken early on in our session. I have outlined the profile of Peter's right knee at the top of the pedal stoke. Note, that although Peter is looking down in this photo, how far his right knee sticks out. At this point it is pretty much inline, front to back, with his rear brake lever. Also note the gap that is created between his leg and the frame. I have not scientific data to back this up, but I would guess that the airflow through that space is not smooth and may create unwanted drag. In Figure 5 you can see how, after our discussion, Peter's knees are now much tighter to the frame and his is creating a much tighter profile. I left the red profile from Figure 4 to illustrate the difference more clearly. Results of the exercise |
   |
